2011-03-27 23:51 — By Erik van Eykelen
Setting Up Private Streaming With Cloudfront and Ruby on Rails
I had to setup private streaming using Amazon’s CloudFront for a project recently. I thought it would be pretty straightforward but it took me a bit longer than expected. I hope this blog post gives you a kickstart with CloudFront and Rails.
Let’s summarize the entire process first before going into the details. In order to setup private streaming you have to take the following steps:
- Create an S3 bucket and upload some video files to this bucket.
- Create a CloudFront distribution.
- Give CloudFront access to your S3 bucket.
- Create an AWS public and private Key Pair.
- Look up your AWS Account Number.
- Create a test web page and test whether you can playback your video files.
Below are the details for each step:
I’m using a tool called Bucket Explorer for OS X (it also works on Windows and Linux). It is aptly named because it’s a bucket of hurt. It is ugly (like most Java desktop apps), it’s buggy, riddled with spelling mistakes and confusing, inconsequent wording but it gets the job done and it is (as far as I know) the only app for Mac that enables you to manage the complete cycle described below. For Windows you might want to check out an app called CloudBerry.
Create an S3 bucket and upload some video files (FLV, MOV, M4V or whatever you prefer) to this bucket. Set the “Group: All users” permissions to None, if this is not already the case. You don’t want folks to be able to simply download your files from S3 defeating the whole purpose of private streaming.
Launch Bucket Explorer and create a new distribution:

Figure 1
- Choose the S3 bucket you created from the “DNS Name” drop-down.
- Select “private streaming” from the “Type” drop-down.
- Add an optional CNAME. I recommend doing this later, after you’ve checked that everything works without a CNAME because it introduces an extra point of failure if you do it wrong.
- Tick the “Enable Distribution” check box.
- Click the “Advanced” button (see next screenshot).

Figure 2
In the Advanced window you must do three things:
- Tick the “Make Private Content Distribution” checkbox.
- Click the Generate Origin Access Identity button. You should only do this once. You’ll be able to re-use the ID for other distributions.
- Click the “Trusted Signer Account Number” field and paste your AWS Account Number. Click the “+” button to add the Account Number.
- You can find your Account Number in your AWS Account Settings screen:
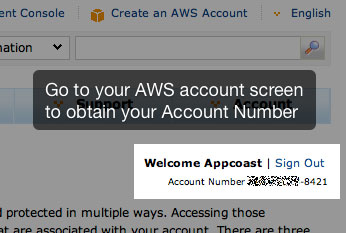
Figure 3
Click OK in the Advanced window to save your changes. If you go back to the Advanced window and you don’t see your Account Number listed then don’t despair. If the account you are using to sign into S3/CloudFront is the same account to which this Account Number belongs then Bucket Explorer will not show this number.
When you click “Create” (or “Update”) in the Distribution window then your distribution will be picked up by the CloudFront edge servers. Note that this can take a while, I’ve seen it taking anywhere between 5 to 15 minutes. During this time the Status will be “InProgress” (sic).

Figure 4
You’ll end up clicking the Refresh button a lot in Bucket Explorer because it hardly ever refreshes the UI automatically.
While you’re waiting for your distribution to be pushed to far away places on the planet, you should copy the so-called “S3 Canonical User ID” to the clipboard. You do this by clicking the “Origin Access Identity List” button which opens a window containing one or more IDs. Select the one you used in the Advanced window (see figure 2). Then click “Copy S3CanonicalUserID” to copy the ID to the clipboard (notice the sloppiness of the Bucket Explorer developers when it comes to spaces and lower/uppercase).
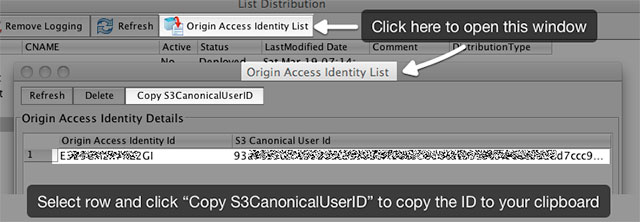
Figure 5
Now close the Distribution window and return to the list of S3 buckets. Select the bucket you wish to make available to the CloudFront distribution you just created. After selecting the bucket, click the ACL(s) icon to open the ACLs Preferences window. In there, click the “Add access by Email-ID/ID” button. Paste the S3 Canonical User ID from the clipboard into the text field. Click OK to save. Do not forget to tick the “Read” permission for this new “user”. Click “Update ACL” to set the permissions for this bucket and its files.

Figure 6
I’ve had a fair share of issues setting permissions to buckets and files inside buckets. Sometimes it seems Bucket Explorer does not set the permission to all files inside a bucket. I have not been able to pinpoint the exact reason. Just make sure that the bucket and file(s) you’re testing with are set to the proper permissions.
You can check whether the permission for a bucket or file is properly set by selecting an object and clicking the “ACL(s)” button again. If all is well, the S3 Canonical User ID should match the details as shown in figure 5 (in this example notice that the origin ID in figure 5 and 7 both end with “…GI”).

Figure 7
We’re almost ready to start testing the new distribution in a Rails project. Two steps remain though. In the code example you’ll notice a reference to a streamer URL. This is the URL of the CloudFront (streaming) distribution server (Amazon actually provides the capabilities of Adobe’s Flash Media Server). Go back to the Distribution window, select the distribution you just created and right-click to reveal a contextual menu. Select “Copy DomainName” (sic) to copy the URL to the clipboard. Store it somewhere because we’ll need it later on.

Figure 8
Another piece of data we’ll need later on is a private key and Key Pair ID. You can create these by going into your AWS account (look for the “Security Credentials” menu).

Figure 9
You can create up to two key pairs. Create one now if you haven’t already. Be very careful to store the private key in a safe place because AWS only hands it out once (they don’t even store it, obviously). Also copy the “Key Pair ID” and store it somewhere because we’ll need it later.
Now we’re finally ready to test the private streaming distribution. Before you start coding, check whether the distribution status says “Deployed” (see figure 4).
In order to test the streaming distribution, create a new Rails project and add the class below to the models folder (or place it in a lib or extras folder, I like to separate ActiveRecord models from other classes).
class Cloudfront

  require 'openssl'
  require 'digest/sha2'
  require 'base64'

  KEY_PAIR_ID = "---replace-me---"

  def self.get_url(_request, _resource)
    url = get_signed_url(_resource, _request)
    # Escape characters for proper embedding in Flash parameters
    return url.gsub("?","%3F").gsub("=","%3D").gsub("&","%26")
  end

  protected

    def self.get_signed_url(_resource, _request)
      pk_file        = Rails.root.join('config','--your-private-key--.pem')
      key            = OpenSSL::PKey::RSA.new(File.readlines(pk_file).join(""))
      policy         = create_policy(_resource, _request)
      sigcrypt       = key.sign(OpenSSL::Digest::SHA1.new, policy)
      urlsig         = escape_string(Base64.encode64(sigcrypt))
      encoded_policy = escape_string(Base64.encode64(policy))
      return "#{_resource}?Policy=#{encoded_policy}&Signature=#{urlsig}&Key-Pair-Id=#{KEY_PAIR_ID}"
    end

    def self.create_policy(_resource, _request)
      expires = 1.hour.from_now.to_i
      # Skip IP check for localhost (AWS:SourceIp does not work with localhost)
      if Rails.env.development?
        policy = %{ {"Statement":
          [{
            "Resource": "#{_resource}",
            "Condition": {
              "DateLessThan": { "AWS:EpochTime": #{expires} }
            }
          }]}
        }
      else
        ip = "#{_request.remote_ip}/24"
        policy = %{ {"Statement":
          [{
            "Resource": "#{_resource}",
            "Condition": {
              "DateLessThan": { "AWS:EpochTime": #{expires} },
              "IpAddress": { "AWS:SourceIp": "#{ip}" }
            }
          }]}
        }
      end
      return policy
    end

    def self.escape_string(_str)
      _str.gsub('+','-').gsub('=','_').gsub('/','~').gsub(/\n/,'')
    end

end
Finally you can create a view:
<%
  # If your S3 path looks like this: https://bucketname.s3.amazonaws.com/videos/video1.flv
  # then filename must be 'videos/video1.flv'
  filename = 'videos/video1.flv'
  file = Cloudfront.get_url(request, filename)
  player = '/swf/player-5.5.swf' # E.g. JW Player
  streamer = 'rtmp://--replace-me--.cloudfront.net/cfx/st' # Your distribution URL or CNAME, no trailing slash!
  width = 640
  height = 480
  flashvars = "file=#{file}&streamer=#{streamer}&height=#{height}&width=#{width}&autostart=true"
%>
<object type="application/x-shockwave-flash" id="player" name="player" data="<%= player %>" width="<%= width %>" height="<%= height %>" classid="clsid:D27CDB6E-AE6D-11cf-96B8-444553540000">
  <param name="wmode" value="transparent" />
  <param name="movie" value="<%= player %>" />
  <param name="allowfullscreen" value="true" />
  <param name="allowscriptaccess" value="always" />
  <param name="flashvars" value="<%= flashvars %>"/>
  <embed type="application/x-shockwave-flash" src="<%= player %>" width="<%= width %>" height="<%= height %>" allowscriptaccess="always" allowfullscreen="true" flashvars="<%= flashvars %>" />
</object>
- The
filenamevariable must be set to the file name without the bucket part. This is crucial but logical. The distribution already points to your bucket, so it knows the base path for your files. - The
playervariable must point to a Flash video player. I use JW Player but other players should work as well. If you don’t get it working with another player then first try JW Player and then try to get this other player working by iterative debugging. - The
streamervariable must be set to the domain name you previously copied (see figure 8). Paste it where the code says--replace-me--. Do not put a slash behind the.../cfx/stpart of the streamer URL.
Once you’ve modified the variables to match your setup, hit reload and your video should start to stream from your secure distribution.
